1. Introduction and Motivation
As applications and the teams that support them grow, the architectural patterns that they use need to adapt with them. Tools like Apache Kafka®, RabbitMQ and other publish/subscribe technologies fill a key role in this process, enabling the adoption of new architectures based on streaming, command/query responsibility segregation, and other event sourcing patterns. However, adopting these technologies can be a complex process, potentially requiring changes to every component of the existing system.
Fortunately, in the Kafka ecosystem there are tools that can help bridge the gap between Kafka and other systems.
Metrics delivery and analysis
In this post, we’re going to look at an example of migrating an existing metrics delivery and analysis pipeline from a REST-based architecture to Kafka, with a particular focus on 2 open source technologies that can help bridge the gap between Kafka and existing external systems like REST clients and data analysis tools.
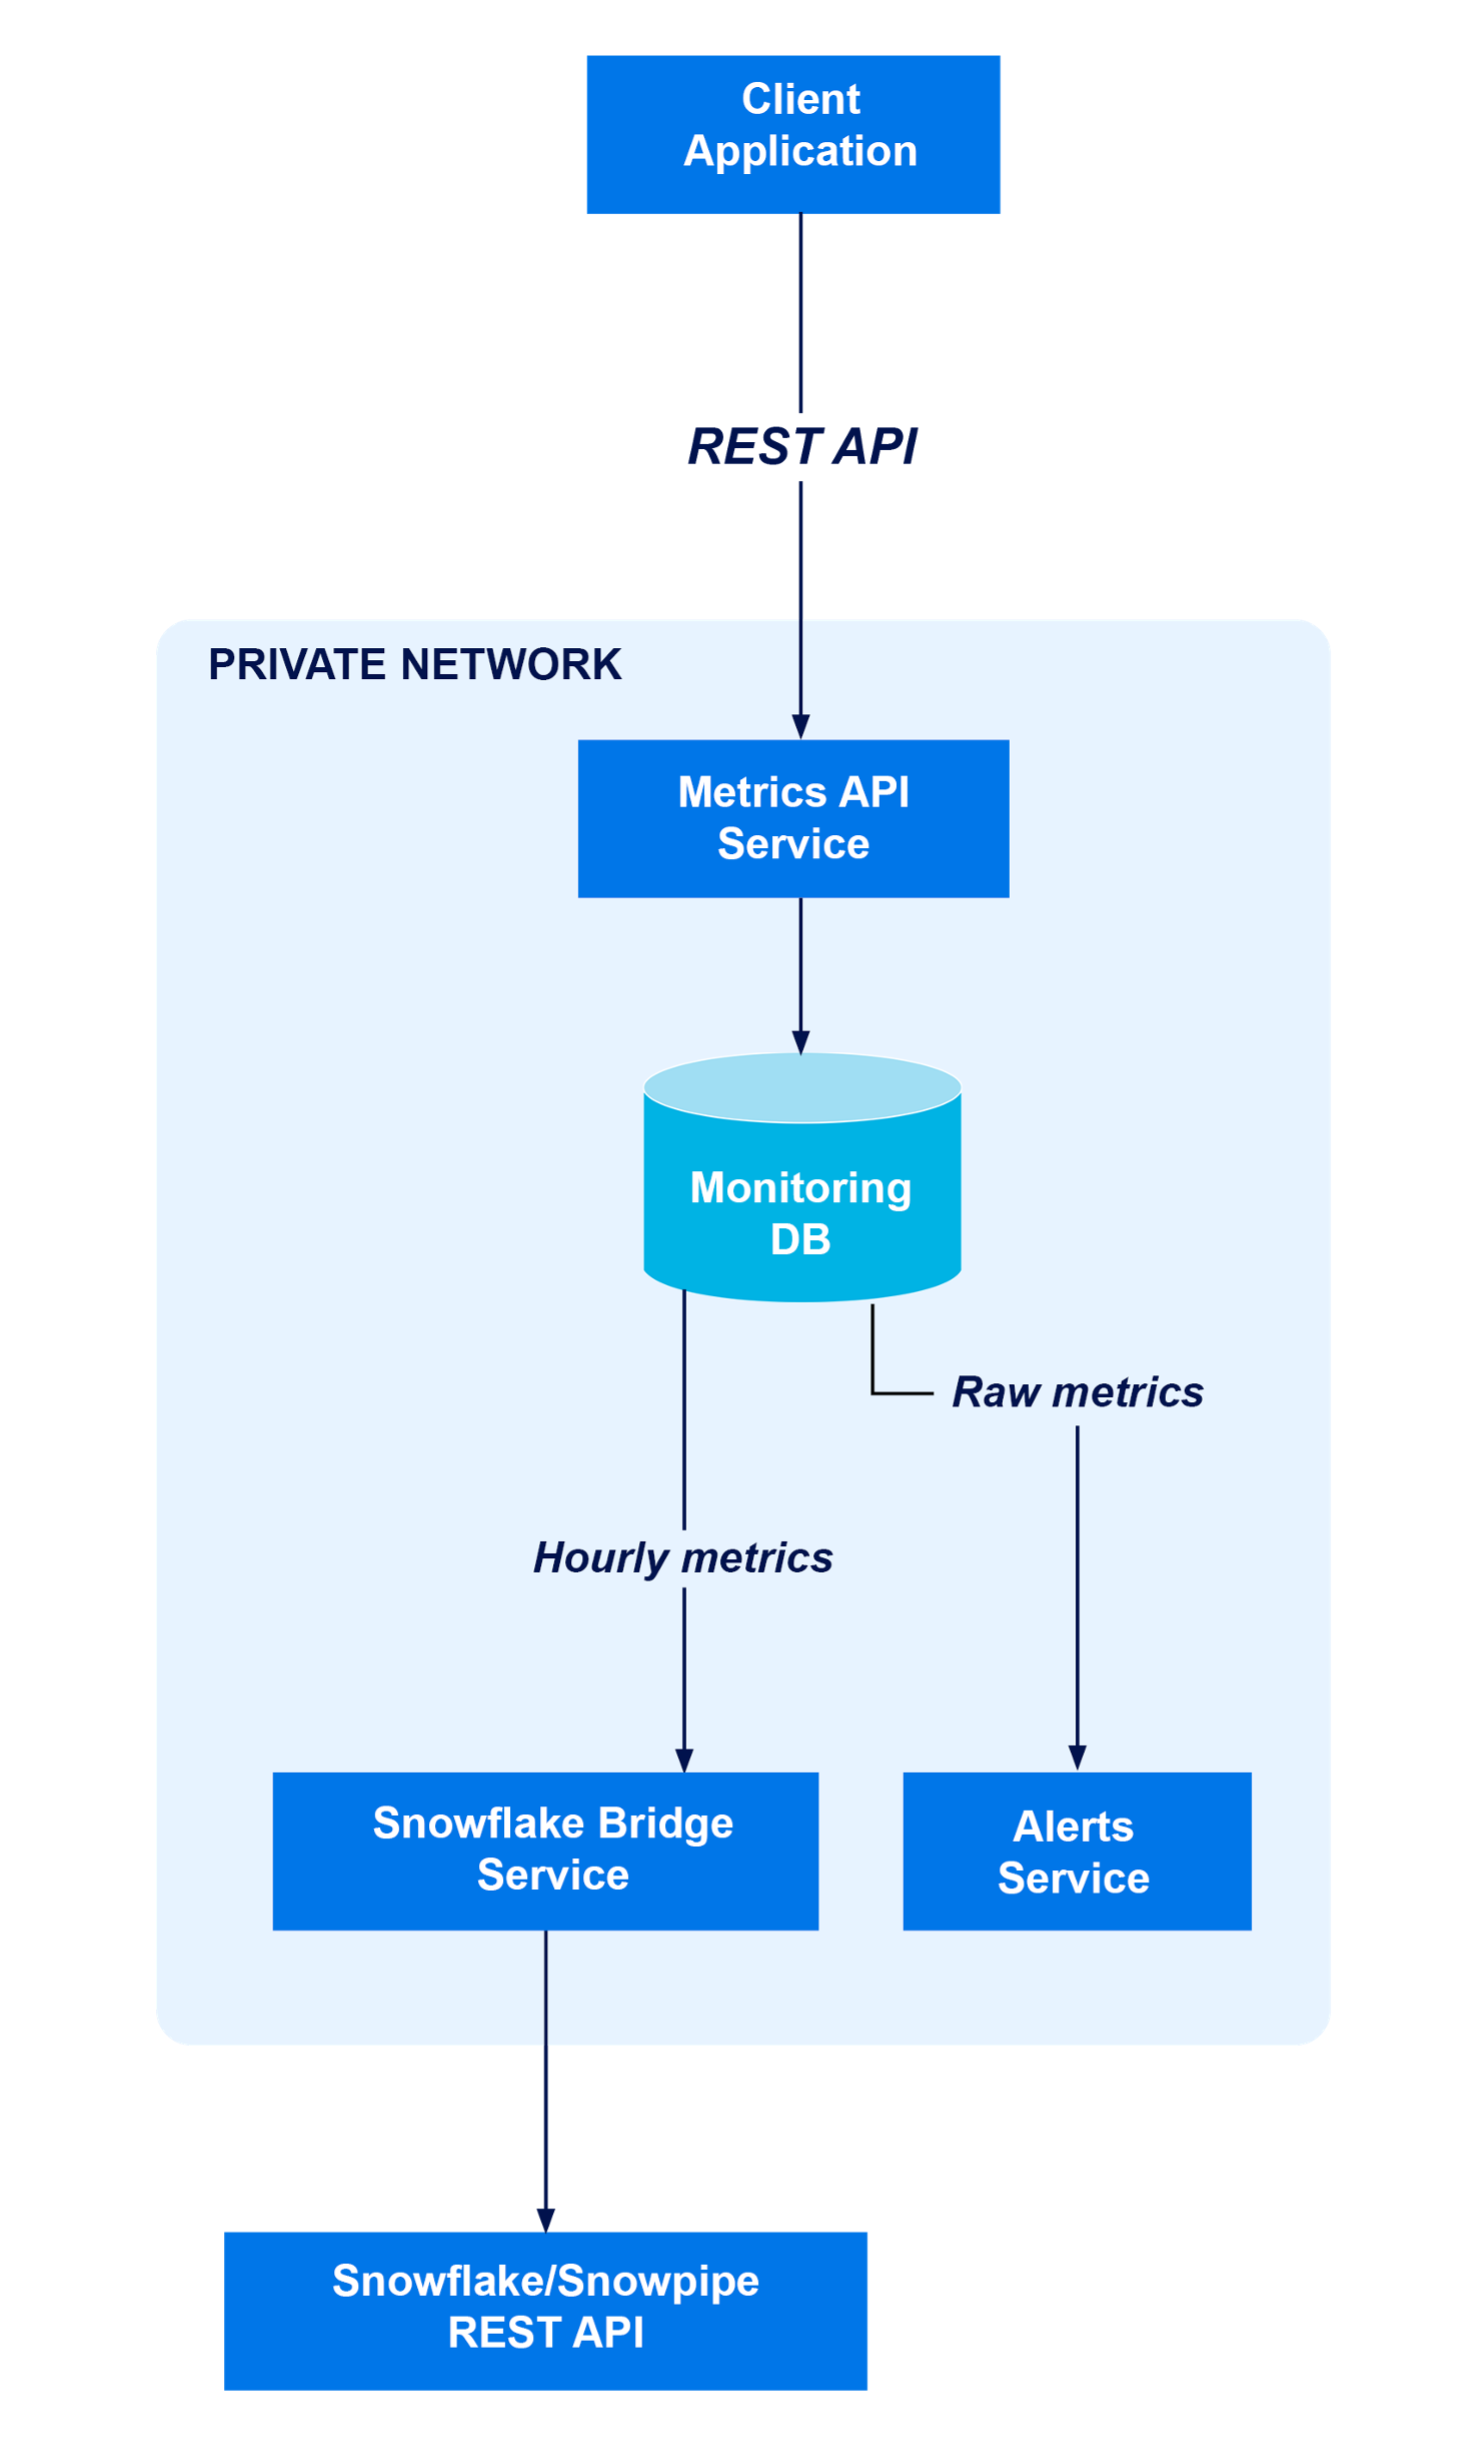
To keep the example small, we’re going to imagine a relatively simple system, consisting of:
- Client applications that need to ship some kind of metrics or other time-series data for analysis. In this example, this is a NodeJS server application
- A REST API server that receives these metrics from the client and maybe performs some initial processing
- A common database, used for both application data and metrics
- A data analysis and visualization tool. In this case we’re using Snowflake, but other tools (e.g., Kibana) would fit here, too.
A future post in this series will extend this example to show how you can integrate all these tools with other Kafka-native applications using other data formats such as Apache Avro™ or Protobuf.

1.2 Reasons to Use Kafka
Event sourcing patterns come at a cost! They can add complexity, and while that complexity is often worth it in the long run, it’s important to remember that these tools are not a silver bullet.
That said, there are a few major reasons to consider introducing Kafka to a growing system like the one described above:
- You’d like to separate out some responsibilities from the API server, for any number of reasons including:
- The API server’s responsibilities are growing, and it’s becoming more and more difficult to manage these responsibilities in a monolithic application.
- There are lots of different systems that need to respond to client events, and doing all this behaviour in the API server is making it cumbersome and slow.
- The database is no longer fit for purpose: it’s being used both for application state (reads/writes roughly balanced, latency is important) and batch processing (read-heavy), and this is increasing the load in a way that negatively impacts the latency-critical tables.
- Perhaps you want to introduce a stream-processing application model, for example using Kafka Streams
1.3 Keeping the Scope Small
Big migrations like this come with a lot of caveats and questions that your team should consider before beginning a migration like this. But the one we’re going to be focusing on here is: What about the existing systems we’ve invested in?
Your team has probably already invested significant effort into the clients of this system; including client applications (which already work, using a HTTP/REST API) and a data analysis system such as Snowflake.
If migrating the system across to Kafka (even only in part) involved building:
- A whole new transport layer for your client applications, using Kafka client libraries appropriate to the platform, and
- A new application to funnel data from Kafka into Snowflake, which your team will need to develop, deploy, and maintain.
Then the effort and risk involved in migrating even part of the system to the new architecture could be prohibitive. What we’d like in this scenario is a way to perform the key migration (moving our metrics processing from our REST API server to Kafka) while minimizing the changes required to other parts of the system.
Fortunately, there are a couple of tools available to assist with these kinds of migrations:
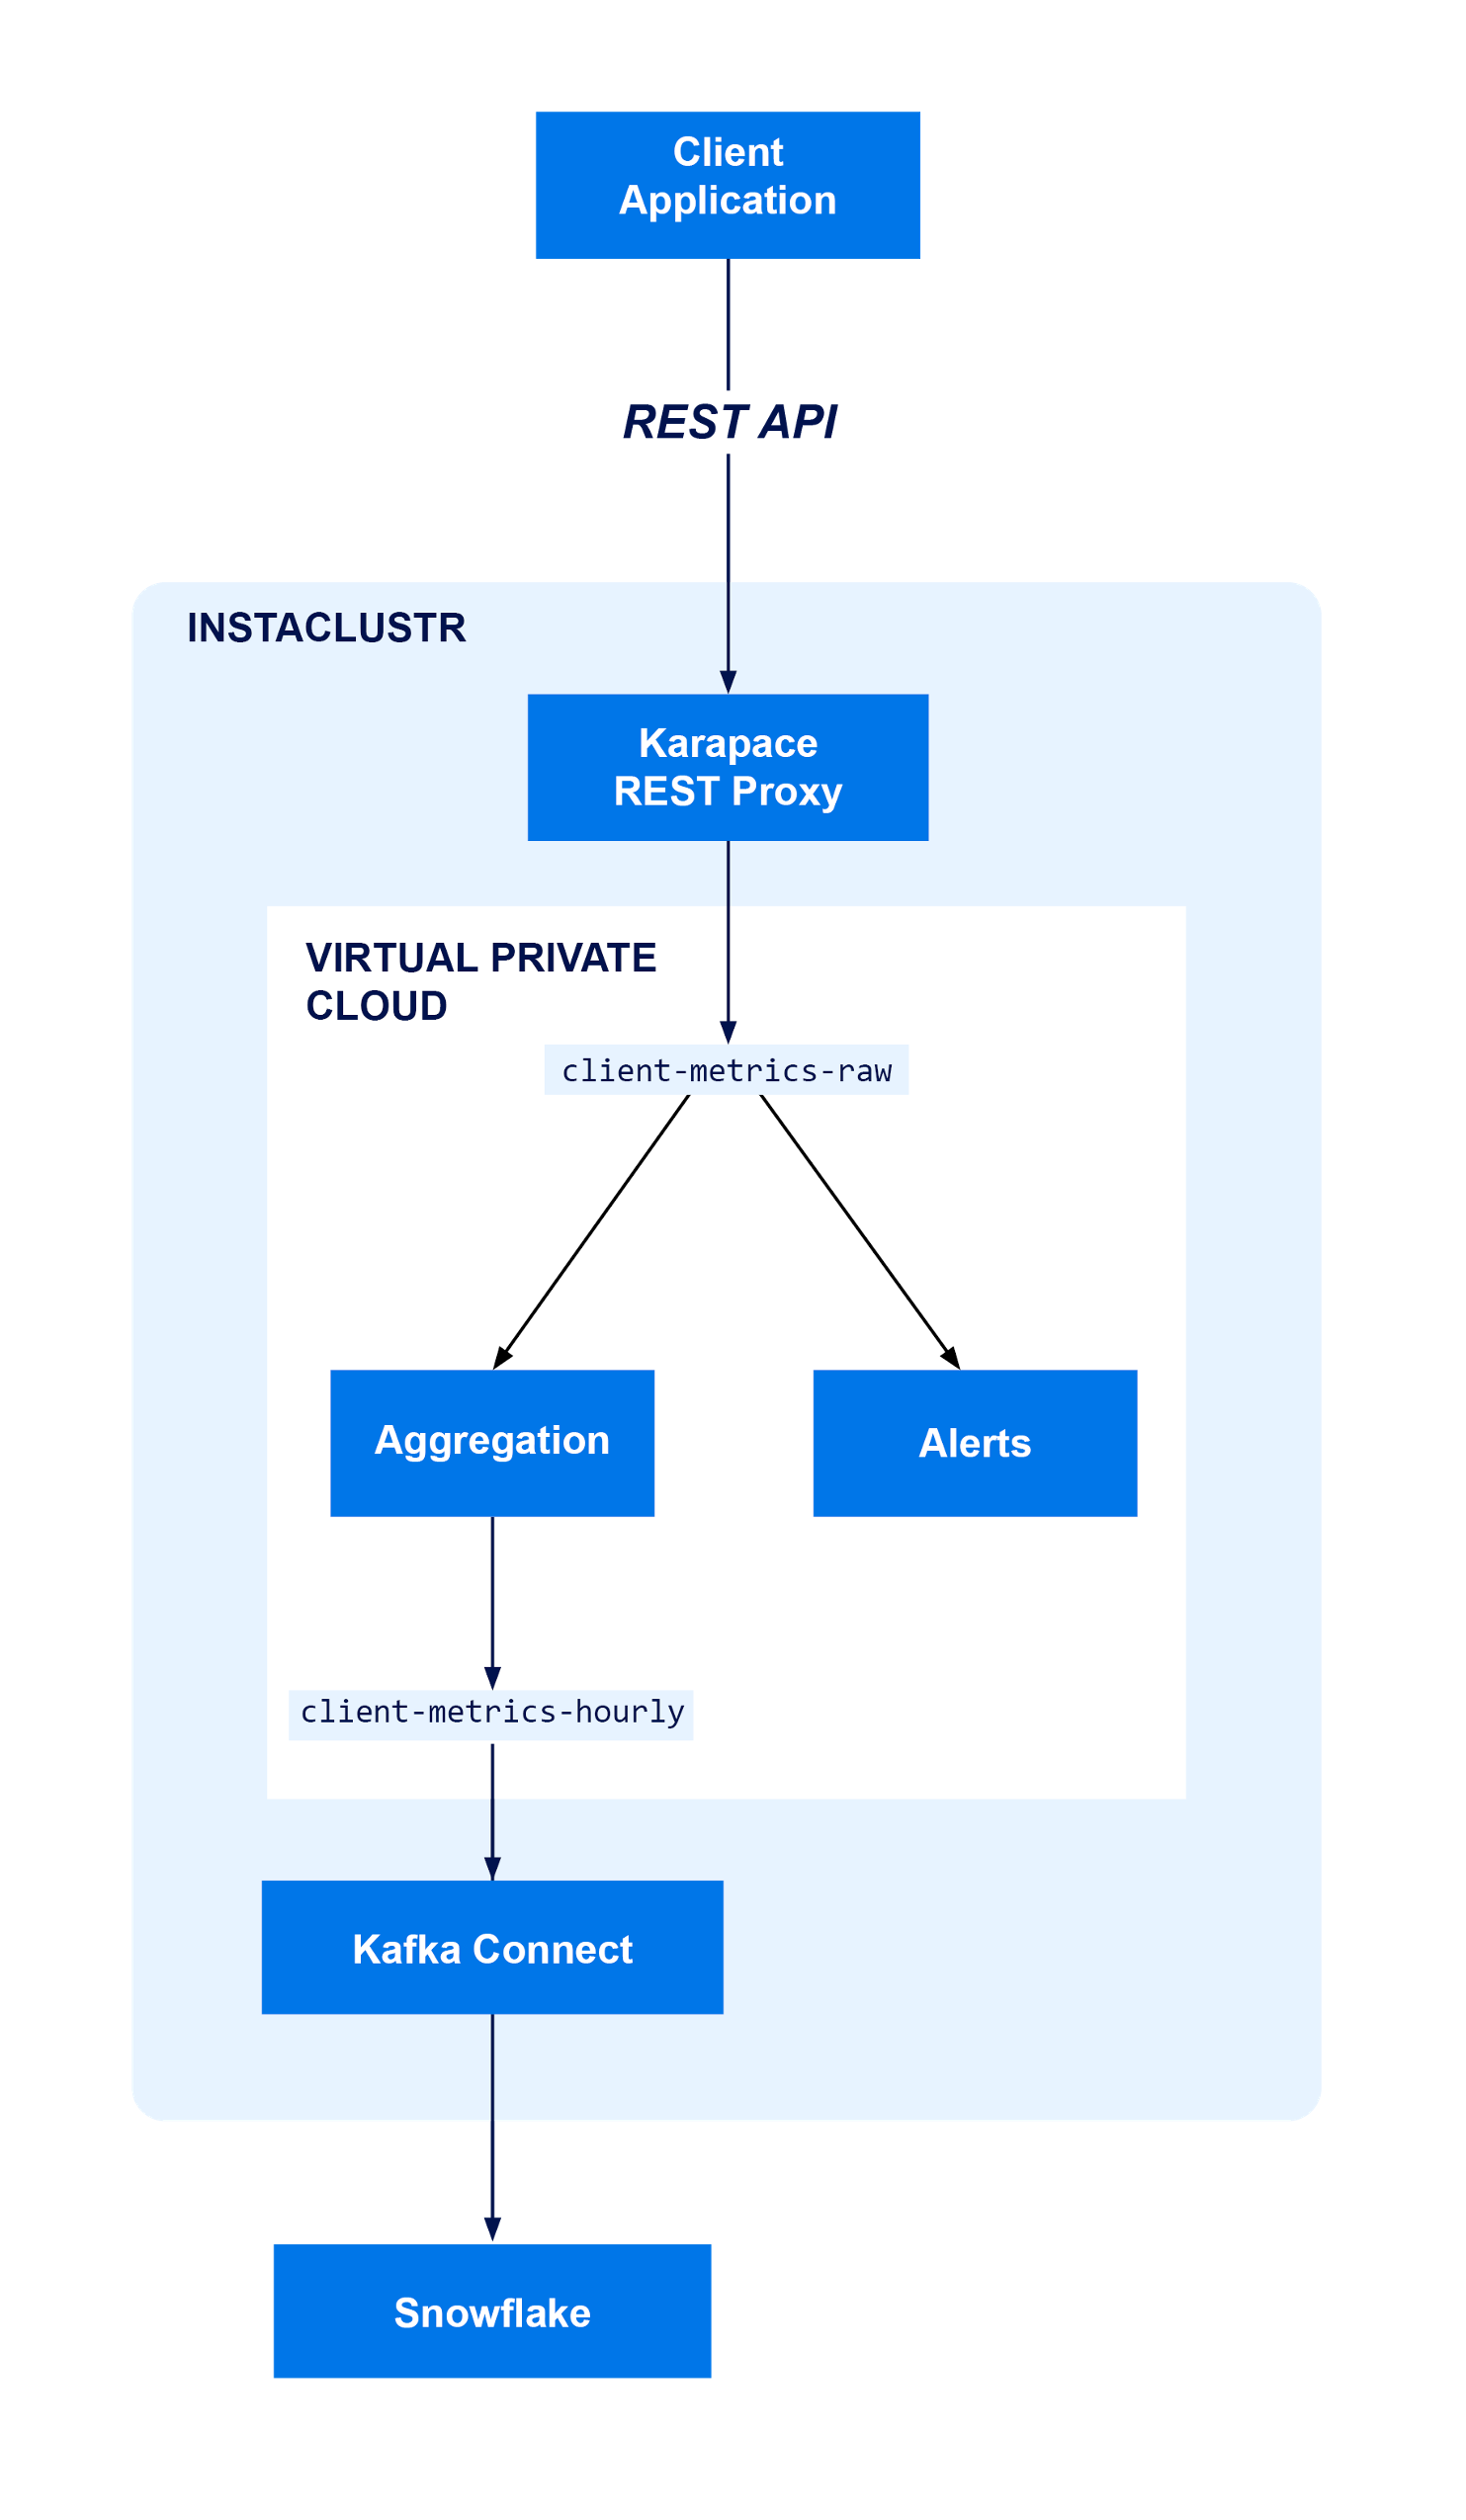
- Karapace, an open source implementation of a REST Proxy and Schema Registry for Kafka. This will allow us to ingest data into a Kafka cluster using a REST API similar to the one already in use by our client applications, using libraries the team is already familiar with
- Kafka® Connect, a plugin-based system for moving data between Kafka and other data storage and analysis systems, for which Snowflake conveniently provide an open source connector. This will allow us to move data from a Kafka topic into Snowflake without needing to put effort into developing and deploying a new application for this task.

Note that while there’s no explicit DB in this diagram, Kafka is effectively filling that role for both downstream applications we’re concerned with in this example—the Alerts system only needs to know about events when they happen, and Snowflake has its own data storage anyway.
If we needed an additional database (for example, to support ad-hoc queries on relational data derived from messages delivered on Kafka topics), we could set one up using Kafka Connect by deploying a Cassandra cluster using the Instaclustr Managed Platform and connecting it using the bundled sink connector. If you wanted to use a database for which no bundled connector is provided, you can use a custom sink connector, just like we’re going to do with Snowflake in this example.
2. Prerequisites
Before we can set up either of the above tools, we’ll also need a Kafka cluster to use as the transport between Karapace and Kafka Connect. We’ll set up a Kafka cluster using the Instaclustr Managed Platform on AWS, but you can use the cloud provider of your choice by making the appropriate selection from the Instaclustr Console.
For the following sections, the tools we’re going to need include:
- A Kafka cluster, which we can deploy from the Instaclustr console
- A Karapace installation configured to use the Kafka cluster above. We could deploy this ourselves, but since the Instaclustr platform provides a convenient way to deploy Karapace alongside a Kafka cluster when the latter is provisioned, we’ll use that instead
- A Kafka Connect cluster, again configured to use the right Kafka cluster. For simplicity we’ll deploy this using the Instaclustr platform as well, which will connect the Kafka Connect and Kafka clusters together without us needing to do any additional configuration.
2.1 Setting up Kafka with Karapace on the Instaclustr Managed Platform
To begin, we’ll set up our Kafka cluster on the Instaclustr Managed Platform with the REST Proxy add-on by following the instructions in the documentation.
You can use the Schema Registry add-on as well, which will help to ensure that the data being ingested by your system has an appropriate structure (we’ll be covering how to use Schema Registry and Kafka Connect to get data in schema-based formats like Protobuf and Apache Avro in a future blog in this series). For now, though we’re focusing on adapting a JSON-based system and have no need for schema validation, so we’re going to skip the schema registry.
Once Kafka and the REST proxy are up and running, we’ll need a topic to send and receive the log messages on. By default, Instaclustr’s Kafka clusters are configured with the auto.create.topics.enable option set to true, so as long as we’re comfortable using the default topic settings there’s no action needed here; Kafka will create our topic automatically the first time we send a message to it. If you’d like to use a custom replication factor or number of partitions however, you’ll need to create a topic yourself using the Kafka CLI or the Instaclustr API. You can find instructions on creating Kafka topics on the Connection Info page in the Instaclustr console.
While we’re thinking about topics and Kafka, it’s worth remembering a bit about how Kafka works—in particular, we need to think about partitioning. For now, we’re going to use some kind of “client id” as the partitioning key so that messages from the same client will be routed to the same partition. Because Kafka guarantees message order within a partition, this also ensures that the order these messages will be read in is consistent with the order in which they were written.
Finally, we’ll need to configure the firewall rules for our cluster so that client applications can reach the Karapace Schema Registry. In this example I’m running the client on my local machine, so I’ve added my local IP address to the firewall rules using the Console 1, but you can also do this using the Instaclustr API if you’d prefer a more automated approach.1
2.2 Setting up Kafka Connect With the Instaclustr Managed Platform
As with setting up Karapace, Instaclustr provides instructions for setting up Kafka Connect. For this case it’s important to select the Use Custom Connectors option, as this is what allows us to use the Kafka Connect connector provided by Snowflake.
When you select that option in the Console, you will be prompted to select a storage provider for your custom connectors. Later, we’re going to be deploying our custom connector into this storage provider, but for now it’s enough to ensure that it exists and provide Kafka Connect with the right credentials to access it. For this example, we’ve used AWS S3. If you’re following along and would like to use a similar setup, you can use the AWS CloudFormation template from the Instaclustr Custom Kafka Connect Documentation. We’ll use the same documentation later to install the Snowflake connector.
3. Migrating an Endpoint to Use Karapace Instead of an Existing API Server
In this section we’re going to look at migrating a REST client from using our existing API server POST endpoint, to using Karapace to push data into a Kafka topic.
Note that this only makes sense for some kinds of REST endpoints—in particular, Kafka doesn’t use a request/response model. If a request needs an immediate response, with any kind of application-level semantics, you should consider keeping that request as part of your API server instead of moving it across to Kafka.2
In this example we’ll consider requests that only need success/failure acknowledgement, such as shipping client metrics. For this use case, the acknowledgement that the metrics have been delivered to the appropriate Kafka topic is enough.
With Kafka and Karapace set up and a topic created, we now have a way to receive log messages via a familiar REST API from client-side applications.
We can’t just change the URI in our log-shipping requests and call the job done though: Our existing REST API may expect other information as part of the request that is no longer relevant, and the Karapace API similarly has other needs including authentication and authorization.
Suppose our existing client code looks something like this:
|
1 2 3 4 5 6 7 8 9 10 11 12 13 14 15 |
interface MetricEntry { client_id: string, metric: string; timestamp: Date } function build_metric_shipping_payload(metrics: MetricEntry[]): any { // Build a wrapper around the metrics so that they fit your existing API } async function ship_metrics__before(metrics: MetricEntry[]) { await fetch('https://your.application.server.here/client/logs', { method: 'POST', headers: { 'Content-Type': 'application/json', 'Authorization': '...', 'Accept': 'application/json' }, body: JSON.stringify(build_metric_shipping_payload) }) } |
We only need to make a couple of changes to get this to ship logs to Karapace instead!
- We need to separate the record key and value, so that messages get partitioned correctly
- We need to update the endpoint
- We need to use the right authentication information.
Both the endpoint and authentication information can be found on the Connection Info page of the Instaclustr Console. As discussed above, we’re going to use the client id of the message as the key, so that messages from the same client are delivered to the same partition and kept in a consistent order.
In the end, we’ll need something like this:
|
1 2 3 4 5 6 7 8 9 10 11 12 13 14 15 16 17 18 19 20 21 |
interface MetricEntryKey { client_id: string } interface MetricEntryValue { message: string, timestamp: Date } async function ship_metrics__after(log_messages: MetricEntry[]) { const records = log_messages.map((log) => { return { key: { client_id: log.client_id }, value: { message: log.message, timestamp: log.timestamp } } }) await fetch('<Get this endpoint from the Instaclustr Console>' + '/topics/client-metrics', { method: 'POST', headers: { 'Content-Type': 'application/json', 'Authorization': 'Basic <Get this from the Instaclustr Console>', 'Accept': 'application/vnd.kafka.v2+json, application/json', }, body: JSON.stringify({ records: records }) }) } |
4. Installing the Snowflake Kafka Connector
In order to use custom connectors, we’ll follow the instructions here to install a custom Kafka connector on the Instaclustr Managed Platform, combined with the installation instructions for Snowflake’s Kafka Connector.
We’re going to start by downloading the JAR file for the connector from Maven, then uploading it into an Amazon AWS S3 bucket so that our Kafka Connect application can find and load it.
With that done, we need to send a HTTP POST request to Kafka Connect to tell it to start a connector using the right class, and with the right configuration options.
Sending the request can be done by following the instructions on the Connection Info page in the Instaclustr Console. The configuration of the connector is a little more involved, but Snowflake has plenty of documentation on the available options.
For this to work, we’re going to need a few new pieces of information:
- A 2048-bit RSA key pair as specified by the Snowflake documentation, which will be used to authenticate our Kafka Connect connector to Snowflake
- The name of the database, schema, and table we’re going to put data into in Snowflake. You don’t need to create the table; if it doesn’t exist the Kafka Connector will create it automatically
- Your Snowflake organization, account, and username.
For this example, we can use something like the following to instruct Kafka Connect to start the Snowflake connector with the right options:
|
1 2 3 4 5 6 7 8 9 10 11 12 13 14 15 16 17 18 19 20 21 22 23 24 25 26 27 28 29 30 31 |
#!/bin/bash set -euxo pipefail KC_REST_ENDPOINT=<Get this from the Instaclustr Console> KC_REST_AUTH=<Get this from the Instaclustr Console> curl \ ${KC_REST_ENDPOINT}/connectors -X POST \ -k \ -u "${KC_REST_AUTH}" \ -H 'Content-Type: application/json' \ -d '{ "name": "sink-connector-example", "config": { "topics": "<Your Kafka Topic>", "snowflake.database.name": "<Your Snowflake Database>", "snowflake.private.key": "<Your generated private key here>", "snowflake.schema.name": "<Your Snowflake Schema>", "snowflake.topic2table.map": "<Your Kafka Topic>:<A Snowflake table name>", "snowflake.url.name": "<Your Snowflake organisation>-<Your Snowflake account>.snowflakecomputing.com:443", "snowflake.user.name": "<Your Snowflake username>", "buffer.count.records": "10000", "buffer.flush.time": "60", "buffer.size.bytes": "5000000", "connector.class": "com.snowflake.kafka.connector.SnowflakeSinkConnector", "key.converter": "org.apache.kafka.connect.storage.StringConverter", "tasks.max": "8", "value.converter": "com.snowflake.kafka.connector.records.SnowflakeJsonConverter" } }' |
5. Querying the Data in Snowflake
The Snowflake JSON converter we’ve used above imports objects using the VARIANT type, which is analogous to a JSON object. We can query these objects directly from Snowflake SQL to analyze data and construct visualizations from it.
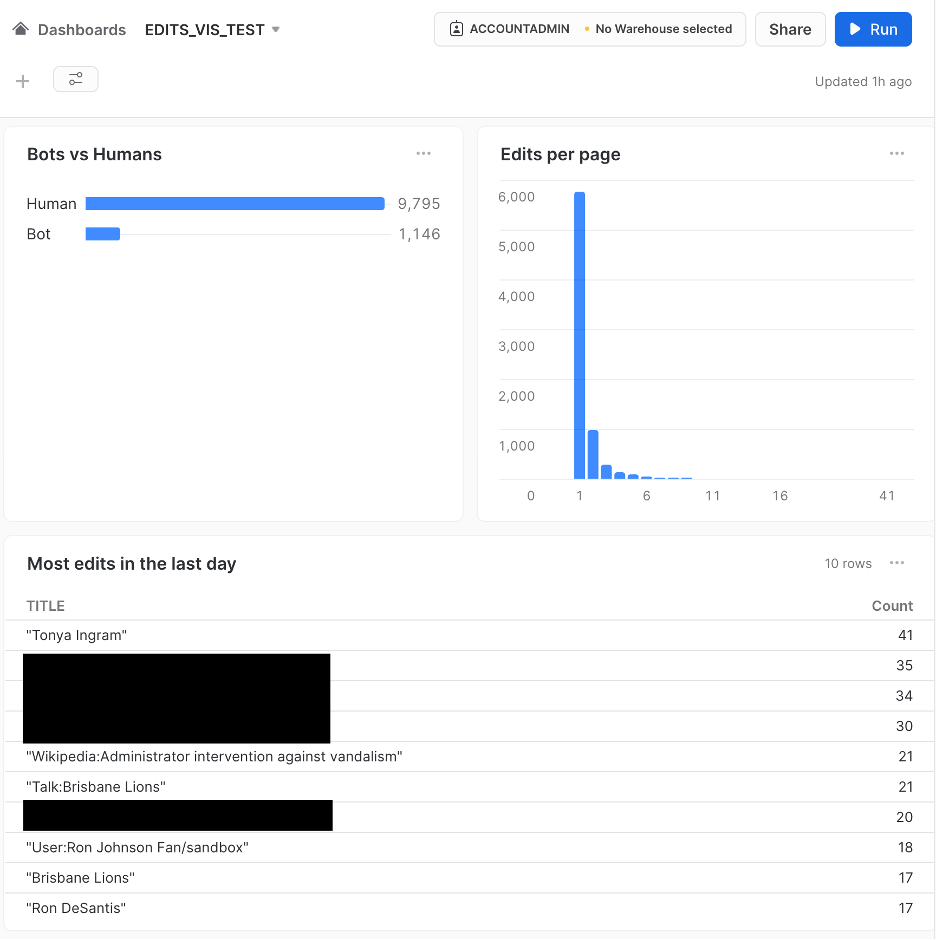
For example, if our input data were from Wikipedia’s Recent Changes feed, we might construct a leader board of most-edited posts in the last day using something like:
|
1 2 3 4 5 6 7 8 9 |
select RECORD_CONTENT:title as Title , count(RECORD_CONTENT:title) as "Count" from <database>.<schema>.<table> where RECORD_CONTENT:timestamp is not NULL and RECORD_CONTENT:timestamp >= dateadd(day, -1, current_timestamp) group by RECORD_CONTENT:title order by "Count" desc limit 10 |
The resulting table in a Snowflake dashboard, after leaving the pipeline running for an hour. Articles referencing specific Wikipedia users have been blacked out.

Snowflake additionally supports ingesting data encoded using Apache Avro or Protobuf. We don’t need those right now because we’re adapting a JSON-based API, but we’ll explore this topic in detail in a future blog post.
6. Conclusion
In this example, we migrated a simple metrics shipping API from an existing custom API server to Kafka, by leveraging Karapace REST Proxy to ingest data into Kafka and Kafka Connect to connect that data to an existing analytics system.
We showed how to deploy these components on the Instaclustr Managed Platform, making use of advanced features like support for custom Kafka Connect connectors. We also saw how the Instaclustr platform makes integrating these technologies with each other painless, by managing the connections between Karapace, Kafka, and Kafka Connect automatically and with minimal user input, while also allowing for complex custom configurations and multi-cloud deployments.
While this is a complete end-to-end example, there are plenty of opportunities for improving and extending this system. In the next blog in this series, we’ll explore some of the ones we’ve mentioned already, including:
- Using Karapace Schema Registry to validate messages when they’re received by the REST Proxy so that dependent systems like Snowflake queries receive consistently structured objects
- Using Karapace Schema Registry to transform incoming metrics in REST format into other widely used data formats such as Apache Avro or Protobuf
- Adding other applications as listeners to the metrics topics to provide streaming analysis, transformation, and alerting capabilities using the Kafka Streams API or other streaming technologies like Apache Samza™.
Footnotes:
- Exposing Karapace directly to the client application might not be the best choice available to you, especially if the client application is a web application that will be publicly accessible. It may be beneficial to put a proxy or load balancer in front of Karapace – or modify your existing API server so that it connects to Karapace – instead of connecting directly from the client. In this example though, we’re assuming a direct connection between the client and Karapace.
- If you want to migrate request/response type patterns to Kafka, you do have options for implementing the client component without introducing a new dependency or networking pattern. For example, you can use Karapace to create a Kafka Consumer you can interact with via a REST API and using that consumer to retrieve responses for requests submitted earlier via Karapace.
