You’re here because you want to learn more about OpenSearch, and I’m here to help!
In this post, I’ll cover:
- Prerequisites and Installs: Things you need to know and have ready so you can follow along as smoothly as possible.
- Setting up OpenSearch on Instaclustr: What it says on the label: I’ll walk you through setup in broad terms with resources for more details.
- Connecting to your cluster with Node.js: I’ll walk you through the code needed and the entire setup process.
- Indexing data in your OpenSearch cluster: I’ll cover a bit about what indexes are, then address how to add and modify them on your cluster
- Searching data in your OpenSearch cluster: Using Node.js, you’ll write a script to search for particular items.
With that said, it’s time to dive into getting you everything you need.
Getting started
This section is split into 2 parts: prerequisites, which are knowledge-based, and installs, which is software that needs to be installed.
Prerequisites
In order to understand the technology used in this tutorial, you’ll need a good understanding of what OpenSearch is and does, and how it works. If you’re completely new to the subject, I recommend you watch Learn Enough to Chat About OpenSearch.
A working knowledge of Javascript will also be helpful if you want to follow the Node.js code. However, there are OpenSearch client libraries for many languages, and if you’re willing to read the docs for them, you could follow along in Java, Python, .NET, etc. Just look in your language’s package manager for the OpenSearch client.
Installs
The only install for this tutorial is Node.js and npm, which you can install from one installer by following the steps for your operating system at the Node.js website.
Setting up your cluster
Now you’re ready to set up your cluster. If you need a detailed tutorial for this, check out Getting Started with OpenSearch or read the Instaclustr support documentation.
Set up an OpenSearch cluster of any size you like (even free trial size), name it something you’ll remember, and provision it. Then take a break to maybe stretch or a breather – provisioning takes about 10 minutes. Then you’ll have a fully functional and ready-to-connect OpenSearch cluster.
Connecting to your cluster
Before you write your code, you’re going to need to collect some information that will allow you to connect and authenticate with the OpenSearch cluster.
Details, details
When you hit the ‘create cluster’ button, it will take you to the cluster detail page, where it keeps you updated on provisioning and eventually cluster status.
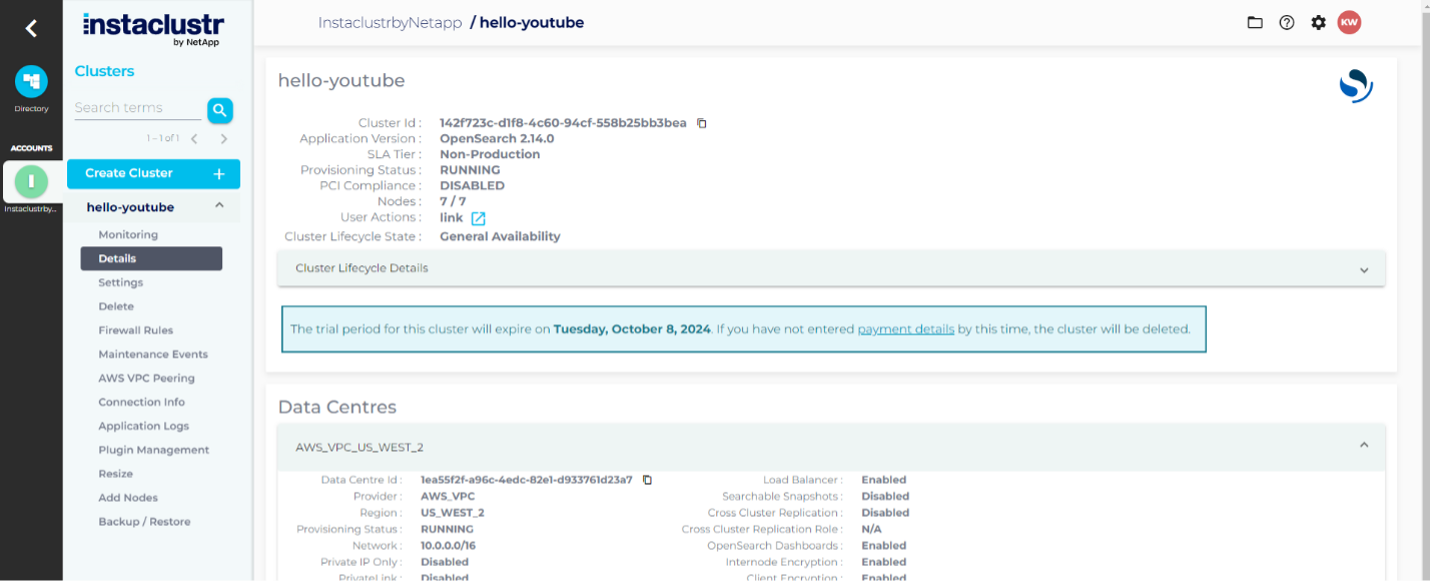
Once your cluster goes from Provisioning Status: PROVISIONING (xx%) to Provisioning Status: RUNNING, the menu on the left will have a few more links enabled than before, as seen in the above image on the left side under the name hello-youtube.
Once this is the case for your cluster, click the ‘Connection Info’ link in the left-side menu. The screen will load in the right-side pane where the details page was:

On this page there is a section starting with ‘Default Credentials…’ that has a username and password. Record these somewhere you can easily get to them for the code part of the tutorial. There is also a section titled ‘OpenSearch REST API’ and it contains a URL. Copy it to the same place you recorded the credentials for now.
Building out the project
Create a folder for your project (I called mine OpenSearch-Nodejs). In that folder, in a terminal, run:
|
1 |
npm init -y |
This will create a package.json file in your project that is used by npm, the node package manager, to describe your project, including its dependencies. We’ll use that to install 2 packages:
|
1 |
npm i @opensearch-project/opensearch dotenv |
This command will install the Node.js library for OpenSearch and a library for storing usernames and passwords safely, respectively. Once this is done, create an index.js file, a .env file, and a .gitignore file if you’re planning on saving this code to Git.
Open the .gitignore file and add:
|
1 2 |
.env node_modules |
Open the .env file and add the following, substituting in your username, password, and url you collected a few steps back.
|
1 2 3 |
OPENSEARCH_HOST='' OPENSEARCH_UNAME='icopensearch' OPENSEARCH_PASS='' |
Now that’s done, you’re ready to write some Javascript.
Writing the Node.JS code
The next task is to create a client that will connect to your OpenSearch cluster, creating an index and adding/searching documents.
Creating an OpenSearch client
In the documentation for the OpenSearch Node.js library, your client instantiation should look something like the following, added to your index.js file:
|
1 2 3 4 5 6 7 8 9 10 11 12 13 14 15 |
'use strict' require('dotenv').config() var host = process.env.OPENSEARCH_HOST var protocol = 'https' var port = 9200 var auth = `${process.env.OPENSEARCH_UNAME}:${process.env.OPENSEARCH_PASS}` // Create a client with SSL/TLS enabled. var { Client } = require('@opensearch-project/opensearch') var fs = require('fs') var client = new Client({ node: protocol + '://' + auth + '@' + host + ':' + port, }) |
This will get the values out of the .env file; use them to build a URL and use that URL to connect to your Instaclustr OpenSearch cluster.
Now that you’re connected, I’ll walk you through adding an index.
Adding an index
To manage indexes, you’ll use the client.indicies object. In your index.js file, add the following code:
|
1 2 3 4 5 6 7 8 9 10 11 12 13 14 15 16 17 18 19 20 21 22 23 24 25 26 27 28 29 30 31 32 33 34 35 36 37 38 39 40 41 42 43 44 45 46 47 48 49 50 51 52 53 54 55 56 57 58 59 60 61 62 63 64 65 |
'use strict' require('dotenv').config() var host = process.env.OPENSEARCH_HOST var protocol = 'https' var port = 9200 var auth = `${process.env.OPENSEARCH_UNAME}:${process.env.OPENSEARCH_PASS}` // Create a client with SSL/TLS enabled. var { Client } = require('@opensearch-project/opensearch') var fs = require('fs') var client = new Client({ node: protocol + '://' + auth + '@' + host + ':' + port, }) const printResponse = (title, response) => { console.log(`\n${title}:`) console.log(response.body) } const handleErrorResponse = (error) => { if (error.meta && error.meta.body) { console.error('Error:', error.meta.body.error) } else { console.error('Error:', error.message) } } const start = async () => { try { // Check the cluster health const clusterHealthResponse = await client.cluster.health({}) printResponse('Get Cluster Health', clusterHealthResponse) // Check if the 'devrel_team' index exists const indexExistsResponse = await client.indices.exists({ index: 'devrel_team' }) if (indexExistsResponse.statusCode === 200) { // Delete the 'devrel_team' index if it exists const deleteIndexResponse = await client.indices.delete({ index: 'devrel_team' }) printResponse('Delete existing `devrel_team` Index', deleteIndexResponse) } // Create the `devrel_team` index const createIndexResponse = await client.indices.create({ index: 'devrel_team', body: { mappings: { properties: { title: { type: 'text' }, name: { type: 'text' }, months_with_team: { type: 'integer' }, }, }, }, }) printResponse('Create `devrel_team` Index', createIndexResponse) } catch (error) { handleErrorResponse(error) } } start() |
This code will, after creating your client connection, check for an index devrel_team, and delete it if it exists. This will prevent issues with re-running this script multiple times. Then, it will create the devrel_team index using client.indicies.create().
You have an index, now it needs documents.
Adding documents to the index
To add documents to the new devrel_team index, modify your index.js file to look like this:
|
1 2 3 4 5 6 7 8 9 10 11 12 13 14 15 16 17 18 19 20 21 22 23 24 25 26 27 28 29 30 31 32 33 34 35 36 37 38 39 40 41 42 43 44 45 46 47 48 49 50 51 52 53 54 55 56 57 58 59 60 61 62 63 64 65 66 67 68 69 70 71 72 73 74 75 76 77 78 79 80 81 82 83 84 85 86 87 88 89 90 91 92 93 94 95 96 97 98 99 |
'use strict' require('dotenv').config() var host = process.env.OPENSEARCH_HOST var protocol = 'https' var port = 9200 var auth = `${process.env.OPENSEARCH_UNAME}:${process.env.OPENSEARCH_PASS}` // Create a client with SSL/TLS enabled. var { Client } = require('@opensearch-project/opensearch') var fs = require('fs') var client = new Client({ node: protocol + '://' + auth + '@' + host + ':' + port, }) const printResponse = (title, response) => { console.log(`\n${title}:`) console.log(response.body) } const handleErrorResponse = (error) => { if (error.meta && error.meta.body) { console.error('Error:', error.meta.body.error) } else { console.error('Error:', error.message) } } const start = async () => { try { // Check the cluster health const clusterHealthResponse = await client.cluster.health({}) printResponse('Get Cluster Health', clusterHealthResponse) // Check if the 'devrel_team' index exists const indexExistsResponse = await client.indices.exists({ index: 'devrel_team' }) if (indexExistsResponse.statusCode === 200) { // Delete the 'devrel_team' index if it exists const deleteIndexResponse = await client.indices.delete({ index: 'devrel_team' }) printResponse('Delete existing `devrel_team` Index', deleteIndexResponse) } // Create the `devrel_team` index const createIndexResponse = await client.indices.create({ index: 'devrel_team', body: { mappings: { properties: { title: { type: 'text' }, name: { type: 'text' }, months_with_team: { type: 'integer' }, }, }, }, }) printResponse('Create `devrel_team` Index', createIndexResponse) const indexDevRelTeam = async () => { const titles = [ 'dev advocate', 'dev advocate', 'dev advocate manager', 'senior dev advocate', 'dev advocate' ] const names = [ 'Sam', 'Mark', 'Jane', 'Alex', 'John' ] for (let i = 0; i < 5; i++) { let response = await client.index({ index: 'devrel_team', id: i, body: { title: `${titles[i]}` name: `${names[i]}`, months_with_team: Math.floor(Math.random() * 24) }, }) printResponse(`Added index ID ${i}:`, response) } } await indexDevRelTeam() } catch (error) { handleErrorResponse(error) } } start() start() |
This will add 5 team members to the index devrel_team. Next, you’ll search your index.
Searching the index
I’ll have you run 2 searches; one with no query that will return all documents, and one with a query to retrieve just one. In your index.js file, add the search functions below:
|
1 2 3 4 5 6 7 8 9 10 11 12 13 14 15 16 17 18 19 20 21 22 23 24 25 26 27 28 29 30 31 32 33 34 35 36 37 38 39 40 41 42 43 44 45 46 47 48 49 50 51 52 53 54 55 56 57 58 59 60 61 62 63 64 65 66 67 68 69 70 71 72 73 74 75 76 77 78 79 80 81 82 83 84 85 86 87 88 89 90 91 92 93 94 95 96 97 98 99 100 101 102 103 104 105 106 107 108 109 110 111 112 113 114 115 116 117 118 119 120 121 122 123 124 125 126 127 |
'use strict' require('dotenv').config() var host = process.env.OPENSEARCH_HOST var protocol = 'https' var port = 9200 var auth = `${process.env.OPENSEARCH_UNAME}:${process.env.OPENSEARCH_PASS}` // Create a client with SSL/TLS enabled. var { Client } = require('@opensearch-project/opensearch') var fs = require('fs') var client = new Client({ node: protocol + '://' + auth + '@' + host + ':' + port, }) const printResponse = (title, response) => { console.log(`\n${title}:`) console.log(response.body) } const handleErrorResponse = (error) => { if (error.meta && error.meta.body) { console.error('Error:', error.meta.body.error) } else { console.error('Error:', error.message) } } const start = async () => { try { // Check the cluster health const clusterHealthResponse = await client.cluster.health({}) printResponse('Get Cluster Health', clusterHealthResponse) // Check if the 'devrel_team' index exists const indexExistsResponse = await client.indices.exists({ index: 'devrel_team' }) if (indexExistsResponse.statusCode === 200) { // Delete the 'devrel_team' index if it exists const deleteIndexResponse = await client.indices.delete({ index: 'devrel_team' }) printResponse('Delete existing `devrel_team` Index', deleteIndexResponse) } // Create the `devrel_team` index const createIndexResponse = await client.indices.create({ index: 'devrel_team', body: { mappings: { properties: { title: { type: 'text' }, name: { type: 'text' }, months_with_team: { type: 'integer' }, }, }, }, }) printResponse('Create `devrel_team` Index', createIndexResponse) const indexDevRelTeam = async () => { const titles = [ 'dev advocate', 'dev advocate', 'dev advocate manager', 'senior dev advocate', 'dev advocate' ] const names = [ 'Sam', 'Mark', 'Jane', 'Alex', 'John' ] await (async () => { for (let i = 0; i < 5; i++) { let response = await client.index({ index: 'devrel_team', id: i, body: { title: `${titles[i]}`, name: `${names[i]}`, months_with_team: Math.floor(Math.random() * 24) }, }) printResponse(`Added index ID ${i}:`, response) } })() } await indexDevRelTeam() const searchDevrelTeam = async (query) => { const response = await client.search({ index: 'devrel_team', body: query, }); console.log('\nSearch Results:'); response.body.hits.hits.forEach((element) => { console.log(element._source); }); } setTimeout(async() => { await searchDevrelTeam({}) await searchDevrelTeam({ query: { term: { title: 'manager' } } }) // Delete the 'devrel_team' index const deleteIndexResponse = await client.indices.delete({ index: 'devrel_team' }) printResponse('Delete existing `devrel_team` Index', deleteIndexResponse) }, 2000) } catch (error) { handleErrorResponse(error) } } start() Q |
And there you have it, a working OpenSearch Node.js application.
Conclusion
In this post, I walked you through setting up an OpenSearch client in Node.js, creating and managing indices, and creating and searching documents. In the next post, I’ll add a bit more data and walk you through more intermediate search queries.
Ready to experience the awesome power of OpenSearch? Spin up your first cluster for free on the Instaclustr Managed Platform and get started today.